
Diving into Quake 2: Building a UI library for modders
Exploring the Quake 2 codebase by creating my first mod, a reusable UI library for modders.

I am not an old-school Quake player, I think the first Quake I ever tried was Quake-Live when it was playable through the browser and even then I think I just tried it for like a minute or two. In recent years I have often drifted towards older games, there is a certain magic with the arcade-like feeling that most old games have where there is close to zero realism and most design decisions are just revolved around fun. What really sparked my interest for Quake was the release of the Quake 2 Remaster, I bought this at a lan party and was surprised that it didn’t only have multiplayer in the form of some PvP deathmatch but also a Coop campaign.
We played the campaign for hours and during that time I grew really fond of the movement in the game, if you play the game like a normal shooter like half-life 2 or something the game won’t be that special (at least to me) but if you play it more like team-fortress 2 where you attempt to bunny jump and rocket jump in a way where you try to gain and maintain as much speed as possible it becomes really fun. For me this created somewhat of a subgame where I try to challenge myself to go as fast as I can all the time, not in a speedrun type of way where I am rushing to beat the game but rather in a fun type of way where you try to go fast and land cool trickshots.
Anyway after this evening I’ve been hooked on Quake in one way or another, currently my go-to game in the evenings is Quake Champions where I can just hop on for a quick deathmatch and close it down when I need to catch my breath.
After finishing my latest post, I started thinking about what I wanted to do next. I could spend more time on my own engine, but that felt like an endless project. I thought about Brainroll and the effort it took me to get to a point where I was confident enough to put it on Steam and making a new game in 3D would probably be ten times the work. At the same time I was battling with some sort of burnout and lack of motivation and needed something to build that spart back up for me to get back into working on my own stuff. This got me thinking about using another engine and build something from that, this would mean that I can focus on game-code rather than building the engine and then building the game. I liked the idea of it but I didn’t like most of the modern alternatives available, I still prefer something that is code-first like my own engine and while you probably can do that in Unity, Godot and Unreal I just don’t feel like that’s the move right now. That got me thinking back to Quake, I remember that Quake was released as open source and after doing a bit of research I found a whole sea of Quake 1, 2 and 3 ports with modern codebases and some of them was so simple to get up and running that I just started tinkering a bit with the engine and after that I was kind of sold.
Quake 1 uses it’s own version of C called QuakeC and while I have nothing against it I kind of want to avoid it if I can. I rather just use C/C++ like I’m used to and also comes with the benefit of me being able to re-use the code I write for other projects. And after looking at some Quake 2 source ports I found that it’s a better match for me, which is great since its basically my first introduction to Quake.
I still don’t know for sure if I’m 100% going to use a Quake engine for my next game but I did decide to do something with it in order to learn and the first thing I decided to do was to create some sort of mod. I joined a community discord channel called “Map-Center” and talked a bit to the people in there, one of the guys I talked to (which turned out actually worked on developing the Quake 2 Remaster) had made a mod called “Horde mode” which sounded really cool, I loaded it up and it was a basically working horde mode where waves of monsters spawn and you need to kill them over and over again. This got me thinking a bit and I was curious about expanding that horde mode into some sort of vampire survivors type of gamemode with levels and upgrades. I decided that Im going to work towards that idea but dividing the idea into several smaller parts and since I have done a lot of UI work on Brainroll and in my own engine I decided to start with building something like what I had in my engine for Quake 2. This was also a good idea because if I end up using the Quake 2 engine for my own game I could re-use the library for my own project.
Before you dive into the Quake 2 codebase it is important to have an idea of the architecture of the engine. I won’t go into depth about the engine but it is important to know that it operates on a client-server model. In Quake 2 the client and server is run in the same executable meaning that evertime you run the engine the server will always run as well (this can vary depending on which source port you’re using). All the game specific logic is built as server-side logic meaning that when making mods you’re modifying server-side code. On top of this the engine is built to dynamically load the game as a dll, meaning that as long as you implement the expected interface you can replace the game code and the renderer uses the same structure which makes it easy to port and modify. This structure is actually really clever for many reasons, one of which I’ve come to really love is that if I make my own mod and host a server for my friends to join, they can also play that mod with me without requiring them to set it up themselves.
Before diving into implementation, I had to understand how UI works in Quake 2. Unlike other engines, where UI is handled with direct access to rendering APIs, Quake 2 mods operate within strict limitations. The game-code (server-side) has no knowledge of the client’s screen size and no built-in functions for rendering UI. At first, this seemed like a deal-breaker. How do you build a UI when you can’t even draw directly to the screen?
To solve this, I explored how existing UIs in the game like the inventory and CTF team selection screen were implemented.
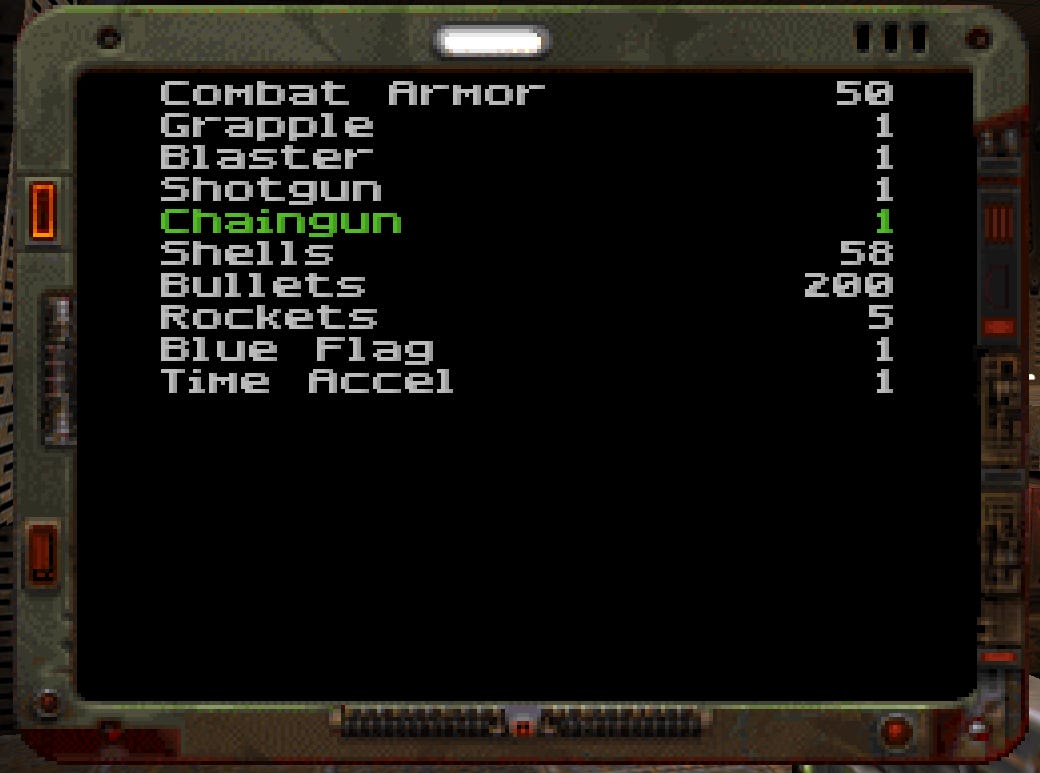

This gave me something to go on because both of these are more or less accessible for a mod. The better of the two to look at is the CTF game mode’s source because it has actually built a somewhat re-usable code to build structured interfaces like the image above. It has support for various text and buttons which is a perfect starting point so I took a look at how it works. It turns out that Quake 2 has a built-in layouting language that sends UI elements as strings to the client through network messages. The client then parses these messages into elements and renders them to the screen. Once you spend some time to try understand the layouting language it is very simple, it is built using two positional tokens and values followed by a UI element for the renderer to draw, example: xl 0 yt 0 string “Hello World” which would translate to “Draw a string at position 0 from the left and 0 from the top”. There are several positional modifiers for each axis that can help with structuring and positioning elements on the screen.
xl - X Left; Offset from left side of the screen.
xr - X Right; Offset from right side of the screen.
xv - X Virtual; Offset relative to a virtual 320x240 screen.
yt - Y Top; Offset from the top of the screen.
yb - Y Bottom; Offset from the bottom of the screen.
yv - Y ;Virtual Offset relative to a virtual 320x240 screen.
When it comes to UI elements the layout has support for a lot of different commands to draw strings, images numbers and tables, . It even has complex nesting logic where you can embed if-statements into the logic however I did not play around with those.
This system is kind of what saved the idea for me to build the library because if I can render images and text I can overlay them in a way to build buttons etc for interesting interfaces. On top of all of this a very KEY factor for me is that I was working with the re-release version of the Quake 2 game code. This release was done using a slightly modified version of the Quake 2 engine which now also moves some of the client code into the game dll, specifically user interface rendering. That means that in my mod I have access to modifying the layout language as I please which helps a ton!
My next goal became to build some sort of scratch area that I can use as some sort of playground when building the library. At first it was not obvious where this would be within the source code but I took a look at what exactly brought the inventory screen up for a player and it turns out all of this is build using “commands”. The commands are client commands that can be triggered from button presses or console commands and is interpreted by the server which then can do something for a client. The parsing of these commands is a long chain of if/else statement so I simply just added a new case to parse the command “customUI” along with the function to call if the player wrote that in their console.
The command to bring up the player’s inventory is “inven”, I originally looked at this command but it uses a special network message called svc_inventory which does not use layout strings so while I couldn’t mimic this function to 100% I could still use it as sort of a baseline for how to setup a command. Looking at the CTF code it sends it strings to the client with a message called svc_layout. Knowing this it was very simple to setup a small experiment that displays a small string on the screen.
void Cmd_CustomUI_f(edict_t* ent)
{
	int		   i;
	gclient_t* cl;

	cl = ent->client;

	cl->showscores = false;
	cl->showinventory = false;
	cl->showhelp = false;

	globals.server_flags |= SERVER_FLAG_SLOW_TIME;

	if (cl->showCustomUI)
	{
		cl->showCustomUI = false;
		globals.server_flags &= ~SERVER_FLAG_SLOW_TIME;
		return;
	}

	cl->showCustomUI = true;

	std::string UIString = "xl 0 yt 0 string \"Hello World\"";
	gi.WriteByte(svc_layout);
	gi.WriteString(UIString.c_str());
	gi.unicast(ent, true);
}
In order to keep displaying the layout on the screen I mimiced inventory and created my own boolean for showCustomUI inside the g_client_t structure. For this to take effect there is a check in G_SetStats where the variable needs to be added to a check.
if (ent->client->showscores || ent->client->showhelp || ent->client->showeou || ent->client->showCustomUI)
	ent->client->ps.stats[STAT_LAYOUTS] |= LAYOUTS_LAYOUT;
And that is all we needed to set up in order to get our first custom layout drawing to the screen.

Just because I’m a curious person I looked a bit into the limits of using this approach to render stuff to the screen. The client code is in some ways tied to the server code, this means that there are some structures that we can’t change. Creating our own network messages would require client modification to parse the new message which we can’t do and modifying the structure holding the parsed server data would also require client changes. Someone mentioned to me that there is something called configstrings which are a general way of sending stuff to clients, it has a flag called CS_STATUSBAR which is actually where the original HUD is kept. This configstrings are limited to 5184 bytes while a layout sent through SVC_LAYOUT is limited to 1024. There is also no way of batching a layout by sending several chained network messages so the hard cap for our network approach is 1024 bytes.
My idea here is if I were to hit the cap using network messages I could later change to using configstrings but for now it wasn’t an issue. Something I thought of was that later I could perhaps include some compression library to compress the layout strings before sending them, or just modify the layout language enough for it to take way less space, I set myself up to have some options basically.
At this point I felt like I had enough information to actually start writing some code for my UI library. I had given it some thought and I wanted to make use of a very simple layouting algorithm as the one I had in Brainroll was too complex and required more information about the client unless I re-structured big parts of it which I did not feel like doing. This reminded me of a layout algorithm called rect cut which I had been wanting to try out for some time and it felt like a pretty great match actually because it operates on rectangles which the Quake 2 layout language also does.
The original article explains the algorithm very well so I’ll refer you to that if you’re intereted in exactly how it works but the gist of it is that you defined a rectangle and then cut that rectangle into smaller rectangles in order you build your UI.
So I implemented the very simple base for rect cut and created my own small layout
struct imq2_rect
{
    float MinX;
    float MinY;
    float MaxX;
    float MaxY;
};

imq2_rect CutLeft(imq2_rect *Rectangle, float Value)
{
    float MinX = Rectangle->MinX;
    Rectangle->MinX = min(Rectangle->MaxX, Rectangle->MinX + Value);

    imq2_rect Result = { MinX, Rectangle->MinY, Rectangle->MinX, Rectangle->MaxY };
    return (Result);
}

imq2_rect CutRight(imq2_rect *Rectangle, float Value)
{
    float MaxX = Rectangle->MaxX;
    Rectangle->MaxX = max(Rectangle->MinX, Rectangle->MaxX - Value);

    imq2_rect Result = { Rectangle->MaxX, Rectangle->MinY, MaxX, Rectangle->MaxY };
    return (Result);
}

imq2_rect CutTop(imq2_rect *Rectangle, float Value)
{
    float MinY = Rectangle->MinY;
    Rectangle->MinY = min(Rectangle->MaxY, Rectangle->MinY + Value);

    imq2_rect Result = { Rectangle->MinX, MinY, Rectangle->MaxX, Rectangle->MinY };
    return (Result);
}

imq2_rect CutBottom(imq2_rect *Rectangle, float Value)
{
    float MaxY  = Rectangle->MaxY;
    Rectangle->MaxY = min(Rectangle->MinY, Rectangle->MaxY - Value);

    imq2_rect Result = { Rectangle->MinX, Rectangle->MaxY, Rectangle->MaxX, MaxY };
    return (Result);
}
As you can see the code is very straight forward. The function accepts a rectangle, cuts the rectangle by the specified amount and returns it as a new rectangle. This works by mutating the given rectangle meaning that if we cut in the same direction several times we will be forming several columns in a row and through this can build more complex layouts.
At this point I was ready to draw the rectangles using the layout system. There was one problem however, there is no way to specify bounds of a rectangle through layout system in Quake. If you are to draw an image the image will be drawn in its full size scaled by the resolution, there is no way for you to give it a specific width and height. This is something that I needed for my stuff to work but luckily I had access to the parsing of the layout language and could simply add two new tokens w and h which lets you specify the width and height of the element you’re building. Of course none of the existing elements uses a width and height but there is also no element to just draw a colored rectangle so I added a new command for that called picc. With this in place I could in a very simple way translate a rectangle to it’s layout string through my awesome new FormatRect function.
std::string FormatRect(imq2_rect Rect, int Color)
{
	float x = Rect.MinX;
	float y = Rect.MinY;
	float w = Rect.MaxX - Rect.MinX;
	float h = Rect.MaxY - Rect.MinY;

	return fmt::format("xl {} yt {} w {} h {} picc {}", x, y, w, h, Color);
}
In a very simple way here we are just translating our imq2_rect into x, y, w, h and use our new picc command along with the color value 0-255 for how bright it should be.
// Inside my CustomUI command
imq2_rect Layout = { 0, 0, 180, 16 };

imq2_rect R1 = CutLeft(&Layout, 16);
imq2_rect R2 = CutLeft(&Layout, 16);
imq2_rect R3 = CutLeft(&Layout, 16);

imq2_rect R4 = CutRight(&Layout, 16);
imq2_rect R5 = CutRight(&Layout, 16);

std::string UIString = "";
UIString += FormatRect(Layout, 0);
UIString += " ";
UIString += FormatRect(R1, 25);
UIString += " ";
UIString += FormatRect(R2, 50);
UIString += " ";
UIString += FormatRect(R3, 75);
UIString += " ";
UIString += FormatRect(R4, 100);
UIString += " ";
UIString += FormatRect(R5, 125);

gi.WriteByte(svc_layout);
gi.WriteString(UIString.c_str());
gi.unicast(ent, true);
Putting this all together we can create a very simple layout to test our changes. Here I am creating an initial layout rectangle and cut three 16 pixels wide rectangles from it’s left side and then I cut two more from it’s right side. Then I call FormatRect on all of the rectangles using different brightness for them. When running the game this would produce this black bar with small grey rectangles on top of it, 3 from the left and 2 from the right.

After this initial confirmation that the idea works I could now proceed with implementing more stuff. I borrowed the idea of having a definition of generic UI elements from the Brainroll source code. From a mod’s perspective I don’t believe that you have a single definition for buttons across mods hence I instead focused more on having a good interface for defining your own elements. Just like how Brainroll does I use a mega struct containing all the data you would need for a UI element and dictate how the element is rendered and behaving using a set of flags.
typedef uint64_t imq2_element_flags;
enum
{
    Element_Flag_Clickable         = (1<<0),
    Element_Flag_DrawBackground    = (1<<1),
    Element_Flag_DrawPic           = (1<<2),
    Element_Flag_DrawText          = (1<<3),
    Element_Flag_DrawBackgroundPic = (1<<4),
};

struct imq2_ui_element
{
    uint64_t Index;
    bool Initialized;

    imq2_rect Rectangle;
    const char *String;
    imq2_element_flags Flags;
    int ColorValue;
    const char *PicName;
};

struct imq2
{
    imq2_ui_element Elements[256];
    uint64_t ElementCount;
};

void IMQ2ElementCreate(imq2 *UI, imq2_element_flags Flags, const char *String, const char *PicName, imq2_rect Rectangle)
{
    imq2_ui_element *Element = UI->Elements + UI->ElementCount++;
    Element->Index = UI->ElementCount - 1;
    Element->Initialized = true;
    Element->Rectangle = Rectangle;
    Element->String = String;
    Element->Flags = Flags;
    Element->ColorValue = 0;
    Element->PicName = PicName;
}
I decided to use a very simple storage model and ignore the handling of navigation between elements for now and went with a simple array. Every new element gets defined with a rectangle, an optional string for displaying, an optional string for an image name and finally a set of flags. Here we use bitwise flags to define our element and just pass them into the ElementCrate function in order to create a new element. This is very powerfull and gives us a lot of customization, for example if I want to create a clickable element with a background and a text I would pass the flags: (Element_Flag_Clickable | Element_Flag_DrawBackground | Element_Flag_DrawText). Combining this I took my previous inspiration from vampire survivors and decided to build a custom upgrades screen that could exist in a roguelike mod. For this I defined a function IMQ2UpgradeSelectionButton that combines several of these UIElements in order to create a more advanced element.
void IMQ2UpgradeSelectionButton(imq2 *UI, imq2_rect_cut Layout, float Value, const char *Label, const char *Pic, const char *Text)
{
    imq2_rect Rectangle = RectCutCut(Layout, Value);

    IMQ2ElementCreate(UI, (Element_Flag_Clickable | Element_Flag_DrawBackgroundPic), NULL, "backtile", Rectangle);

    imq2_rect LabelRectangle = RectCutCut(RectCut(&Rectangle, Cut_Side_Top), 30);
    IMQ2ElementCreate(UI, (Element_Flag_DrawText), Label, NULL, LabelRectangle);

    imq2_rect PicRectangle = RectCutCut(RectCut(&Rectangle, Cut_Side_Top), 50);
    IMQ2ElementCreate(UI, (Element_Flag_DrawPic), NULL, Pic, PicRectangle);

    imq2_rect TextRectangle = RectCutCut(RectCut(&Rectangle, Cut_Side_Top), 60);
    IMQ2ElementCreate(UI, (Element_Flag_DrawText), Text, NULL, TextRectangle);
}
At first we cut out our target rectangle from the given layout, RectCutCut is just a helper function that takes a value and an enum for the direction to cut in and calls one of the previously introduced cutting functions. Using this I render a background over the entire rectangle, I also make the background clickable because I want any highlighting that I imlement to highlight the entire rectangle. From the Rectangle I then cut out its top part to use for label, cut from the top again to create an image element and finally a third time for a description text.

IMQ2UpgradeSelectionButton in a rowAt this point I had basically proven that the library works to build stuff and anything beyond this point is basically just refinement and making it more ready for common use. One of the things that bothered me a bit was placement of things on the screen, specifically centering things. If you recall the different tokens in the layout language for positioning there was only tokens for left, right and virtual for the X axis and top, bollow and virtual for the Y axis. I added my own tokens xc and yc for “X Center” and “Y Center” respectively. After this I had to allow developers decide how to specify which alignment their elements have. Something I really enjoy when building UI systems is make them like a sort of state machine where you push some state into the UI system and pop it when its no longer being in use, this also reduces function arguments as many things can just be on their own stacks.
enum class imq2_horizontal_align
{
    Left,    // xl: MinX is absolute left edge
    Right,   // xr: MinX is offset from right edge
    Center   // xc: MinX is offset from center
};

void IMQ2PushHorizontalAlignment(imq2 *UI, imq2_horizontal_align Alignment);
void IMQ2PopHorizontalAlignment(imq2 *UI);
imq2_horizontal_align IMQ2PeekHorizontalAlignment(imq2 *UI);
I often quickly forget how C++’s namespaces work when I work in other codebases and quickly stumbled upon name clashes when I used my normal enum conventions, luckily you can make an enum into an enum class which is some C++ feature that is supposed to make the enums safer by not allowing their values to implicitly convert to ints alongside with not “exporting their enumerators to the surrounding scope” which is what I want. I also later added stacks for colors and tested it out by aligning and cutting rectangles from different sides.

At this point the system was definitely competent enough to use and build some really cool stuff. I created a new UI element which was a speedometer, it tracks your speed as you move around in the world which is intereting in a game like Quake where you can gain a lot of acceleration. This new UI element didn’t work properly with the new layouting system and it resulted in the progress-bar that displays the speed to be relative to the center because that’s where I wanted my speedometer to be aligned to and that caused the progress-bar to grow from the inside out rather than grow from the left to the right which I wanted to fix.

As clever as I am I decided to add a relation system between UI elements where you can specify one element as the other’s parent which would alter the alignment to use the parent as anchor rather than the screen. To implement this turned out to be quite simple, in order to mark an element as a parent element I would add the token par infront of it and let the client put the specified x, y, w, h to be put on different stacks. I also doubled the positional tokens to include one of each but for relative positioning (rxl, rxr, rxc, ryt, ryb, ryc) which would just mean that instead of using the screen’s normal offset we use the last pushed parent’s values. In order to test this I created a small example where I created a big rectangle and then added 9 smaller rectangles inside it which all uses the different combinations of relative positioning in each axis.

At this point I was like 9 days in of creating the library and I felt like I had learned a ton about the Quake 2 source code and it was a real awesome experience, just to finish things off I wanted to create some sort of demo for an UI replacement which I could later show to some Quake modders that maybe spark some ideas for both for me and for them. Since I already had a progress bar that I used for the speedometer I decided to replace the health bar with a progress bar, I also added a bar for XP points for an imaginary level system. Then I added some buff icons at the top of the screen to simulate powerups and finalized it with the upgrade selection I created earlier which I improved to use the new alignment system.

As I sit here and reflect about the project I am very happy that I decided to go through with it in the way I did. I have never ever seen the point in making a mod because it is just that, a mod. I thought of it as me writing software that is captive within the boundaries of this other encapsulating software, but it is more than that. It is an artform in the same sense people try to squeeze out the very last bit of performance from a machine or trying to make the smallest possible executable or any other form of development that has hard constraints on what is possible. In this project I didn’t have the luxury of a renderer or my code even being client-side, I had to rely on the already existing framework and build upon it to achieve my goals and for this system to even be in place in order for me to do that is very impressive.
The developers of Quake, with not a lot of extra work, gave the community enough tools to create an amazing set of experiences that talented people have embraced. There’s something for every creative person in Quake, modders can craft maps, improve or replace assets, compose music, design models, invent game modes, and much more. For me, diving into game development this way has been a breath of fresh air. It’s reignited my passion for programming, sparking new inspiration and motivation to explore different topics, collaborate with great people, and try new things moving forward.
Looking back at it I realise that this Quake 2 mod means more than just adding something new to an old game. It’s about rediscovering what I love about programming in the first place. The constant problem solving, the creativity of creation and the joy of seeing it all come to life. It has reminded me that there is something very unique and satisfying about working inside a sandbox build by others and then make it your own. I am grateful to the Quake community for keeping this spirit alive.